Single Page Application aka SPA are the norms of the day for building HTML5 Web or Mobile Applications. They have been around for a while and lot of development is happening in various aspects of SPA.
In order to begin understanding the SPA Ecosystem, we need to first understand how SPA can be broken down into various categories. The following diagram depicts that
SPA Ecosystem Categories
[singlepic id=53 w=800 h=600 float=]
The next step is to go through each block of the above diagram, explain each aspect and what Libraries exist today to support them. We will list either most popular libraries only
Build Tool, Dependency Management & Scaffolding
Every Software stack needs set of Build Tools. And as the Software Stack matures, Dependency and Scaffolding tools are added.
Yeoman
Yeoman is a combination of all the above and it has capability to Automate Tasks, pull dependencies and Scaffolds to generate code

Home Page - http://yeoman.io/
three tools for improving your productivity and satisfaction when building a web app: yo (the scaffolding tool), grunt (the build tool) and bower (for package management).
- Yo scaffolds out a new application, writing your Grunt configuration and pulling in relevant Grunt tasks that you might need for your build.
- Grunt is used to build, preview and test your project, thanks to help from tasks curated by the Yeoman team and grunt-contrib.
- Bower is used for dependency management, so that you no longer have to manually download and manage your scripts.
Usage of Yeoman
npm install -g yo grunt-cli bower
Usage of Yo
Install Angular Scaffolding
npm install -g generator-angular
Running Angular Scaffolding
yo angular
GruntJS Concept
GruntJS in most layman terms is Ant for JavaScript
GruntFile.js - Think of it like build.xml
// Project configuration.
grunt.initConfig({
  uglify: {
    my_target: {
      files: {
        'dest/output.min.js': ['src/input1.js', 'src/input2.js']
      }
    }
  }
});
Running uglify - Think about running ant task
grunt uglify
Bower Concept
Bower is a dependency management tool for JavaScript. It is similar to npm (package.json) of node. Just that Bower is for client side JavaScript
Install bower
npm install -g bower
Define Dependencies
{
  "name": "Bower Starter",
  "version": "1.0.0",
  "dependencies": {
    "requirejs": "latest",
    "jquery": "latest",
    "backbone-amd": "latest",
    "underscore-amd": "latest"
  }
}
Run bower to download dependency
bower install
Mobile Native Packaging
Mobile Native Packaging enables 2 things
- Allows HTML5 Apps to be packaged as Native Mobile Applications to be pushed on the app stores
- Enriches the HTML5 Apps by providing them native mobile features to use e.g Camera, GPS, Contacts, Accelerometer etc
The few contenters in the top players for HTML5 Apps for Mobile Packaging are
PhoneGap

PhoneGap aka Cordova is one of the first HTML5 Cross Platform Mobile development framework. PhoneGap supports iOS, Android, Windows Mobile, Black Berry, Bada mobile platforms
PhoneGap can be extended by adding plugins to it.
In terms of Mobile Platform support and Plugin Support PhoneGap is leading
Trigger IO

Trigger IO is the newer kid on block when it comes to HTML5 Cross Platform Mobile Framework.
Trigger IO currently only supports Android and iOS, and has lesser support for its Plugins (in terms of number of plugins available). However, Trigger.io claims its JavaScript to native bridge is upto 5 times faster than PhoneGap. Also its builds are faster and easier for developers to manage.
Trigger.io also supports building iOS Apps on Windows platform, since it builds on the cloud.
StyleSheet Languages
CSS is an key aspect of SPA Space. Even with advancement with CSS3, coding in CSS has been a pain. With no features like inheritances, variables, mix ins creating themes or Responsive UI in basic CSS is a big pain.
That is where new age StyleSheet Languages come into Picture. These Languages provides things like
- Nested CSS Declaration - Hierarchical declaration of CSS classes
- Variables - Which are great of creating themes
- Mix ins - Reusable Snippets of CSS
- and more
There are tools available which can convert the Stylesheet written in these languages to CSS understood by the browser
Top Contenders in this space are
SaSS

Sass allows developers to write CSS in different and more power syntax (SCSS/SASS) and provides tools to convert CSS
sample.scss
$blue: #3bbfce;
$margin: 16px;

.content-navigation {
  border-color: $blue;
  color:
    darken($blue, 9%);
}

.border {
  padding: $margin / 2;
  margin: $margin / 2;
  border-color: $blue;
}
converts to following css after sass compilation
/* CSS */

.content-navigation {
  border-color: #3bbfce;
  color: #2b9eab;
}

.border {
  padding: 8px;
  margin: 8px;
  border-color: #3bbfce;
}
Less

On the same lines as SASS, Less is another library to write CSS in a more powerful syntax and compile it to CSS
Less Syntax
.transition(@transition) {
  -webkit-transition: @transition;
     -moz-transition: @transition;
       -o-transition: @transition;
          transition: @transition;
}
.opacity(@opacity) {
  opacity: @opacity / 100;
  filter: ~"alpha(opacity=@{opacity})";
}

a {
  .transition(all 0.4s);
  &:hover {
    .opacity(70);
  }
}

// Selector interpolation only works in 1.3.1+. Try it!
@theGoodThings: ~".food, .beer, .sleep, .javascript";

@{theGoodThings} {
  font-weight: bold;
}
Generated CSS
a {
  -webkit-transition: all 0.4s;
  -moz-transition: all 0.4s;
  -o-transition: all 0.4s;
  transition: all 0.4s;
}
a:hover {
  opacity: 0.7;
  filter: alpha(opacity=70);
}
.food, .beer, .sleep, .javascript {
  font-weight: bold;
}
Production Optimization
Product Optimization refers to anything which helps HTML based apps to run faster in the production environment. These refers to tools which can help us minify or obfuscate javascript, css and even HTML files. There are other tools which can concatenate images into large images and modify the css accordingly.
Popular tools here are
- jsmin
- uglify
- yui compressors
- etc many others
Typically most of these tools are now available as plugin to Grunt
Class System
JavaScript is a flexible language. Infact it is so flexible it allows you to write class in many manners. The main reason being there is nothing like a class in javascript, its a prototype based language. In this blog we will not go deep into javascript prototype (its a topic for another blog itself)
The most basic class definition can be as follows
var Employee = function(firstName, lastName){
   this.firstName = firstName;
   this.lastName = lastName;

   this.getFullName = function(){
       return this.firstName +" "+this.lastName;
   }
}

var employee = new Employee('Rohit','Ghatol');
console.log(employee.getFullName());
Another way of defining the same class could be
var Employee = function(firstName, lastName){
   this.firstName = firstName;
   this.lastName = lastName;
}
Employee.prototype.getFullName = function(){
   return this.firstName +" "+this.lastName;
}

var employee = new Employee('Rohit','Ghatol');
console.log(employee.getFullName());
The idea to behind talking about Class System is that you should be aware when you choose a profound JavaScript Library (profound meaning large enough), it is bound to have its own Class System
Backbone Class System
Backbone would define its own class as follows
    Person = Backbone.Model.extend(
    {
        defaults: {
            name: 'Fetus',
            age: 0,
            child: ''
        },
        initialize: function(){
            alert("Welcome to this world");
        }
    });

    var person = new Person({ name: "Thomas", age: 67, child: 'Ryan'});
    var age = person.get("age"); // 67
    var name = person.get("name"); // "Thomas"
    var child = person.get("child"); // 'Ryan'
Sencha/ExtJs Class System
Sencha Touch defines its classes differently
Ext.define('User', {
    extend: 'Ext.data.Model',
    config: {
        fields: [
            { name: 'id', type: 'int' },
            { name: 'name', type: 'string' }
        ]
    }
});
AMD - Asynchronous Module Definition
(Asynchronous Module Definitions)
- Allows creation of Modules
- Typically each Module has its own JS file
- One Module can load another, asynchronously
- Modules can be replaced by Mocks for Unit Testing
- Modules can be concatenated and Obfuscated
- Examples
- RequireJS
- CommonJS
- ExtJS
- etc
Lets go over AMD by looking at a example, we will use require.js pseudo code for this
Understanding AMD by an Example
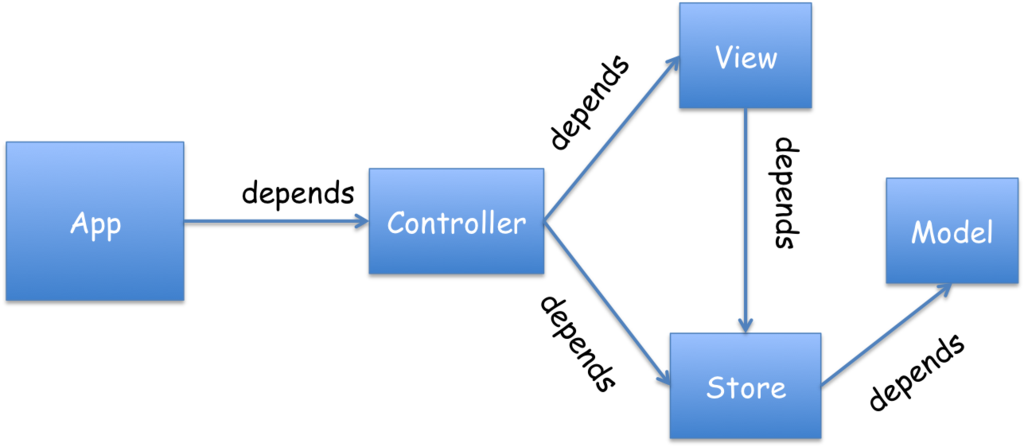 WITHOUT AMD
<head>
<script src=“model.js”></script>
<script src=“store.js”></script>
<script src=“view.js”></script>
<script src=“controller.js”></script>
<script src=“app.js”></script>
</head>
WITH AMD
<head>
<script src=“require.js” data-main=“app.js”></script>
</head>
DEFINE MODEL JS
//Model.js
define(
    [],
    function(){
        return {
            "name":"Todo Model"
        };
    }
);
DEFINE STORE JS
//Store.js - with CRUD Operation
define(
    [‘Model’],
    function(model){
        return {
            “create”:function(){..},
            “retrieve”:function(){..},
            “update”:function(){..},
            “delete”:function(){..},
       };
    }
);
DEFINE VIEW JS
//View.js
define(
    [’jQuery’,’Model’,’Store'],
    function($,model, store){
		store.update(model);

        //render
		$(“.view”).html(…);

        return ..;
    }
) ;
DEFINE CONTROLLER JS
//Controller.js
define(
    [’jQuery’,’View’,’Store'],
    function($,view, store){
        view.setStore(store);
        $(“#placeholder”).html(view.el());
        return ..;
    }
) ;
DEFINE APP JS
//app.js
require(
    [‘jQuery’,’Controller’],
    function($,controller){
        $(“#loading”).html(“”);
        controller.initialize();
    }
);
Writing JavaScript frameworks/libraries targeted for AMD
When Writing JS Libraries following care should be taken
- Your Library can be consumed by Any one
- That person may be using
- RequireJS
- CommonJS
- Directly including JS Library in HTML Page
- Your Library needs to be UMD
- It should load in all possible environments
- With RequireJS Module
- With CommonJS Module
- Without any Module (just by embedding javascript in page)
Example of UMD
!function (name, definition) {
    if (typeof define == 'function' && define.amd) {
        //define module in Require JS
        define(definition);
    } else if (typeof module != 'undefined') {
        //define module in Common JS
        module.exports = definition();
    } else {
        //define module when JavaScript file is directly embedded in page
        this[name] = definition();
    }
}('MessageBus', function() {

    var MessageBus = function () {
        .......
    };

    MessageBus.prototype = {
        publish : function (channel,message){
            ......
        },
        subscribe : function (channels,callbacks){
            .....
        }
    };

    return MessageBus;
});
Router & History
Routers and History frameworks in JavaScript allow Single Page Applications to behave like any other Web Application and obey ground rules like following
- Obey Browser Back and Forward Buttons
- Allow Deep link/Book marking of state in SPA
- Programmatically allow manipulation of history
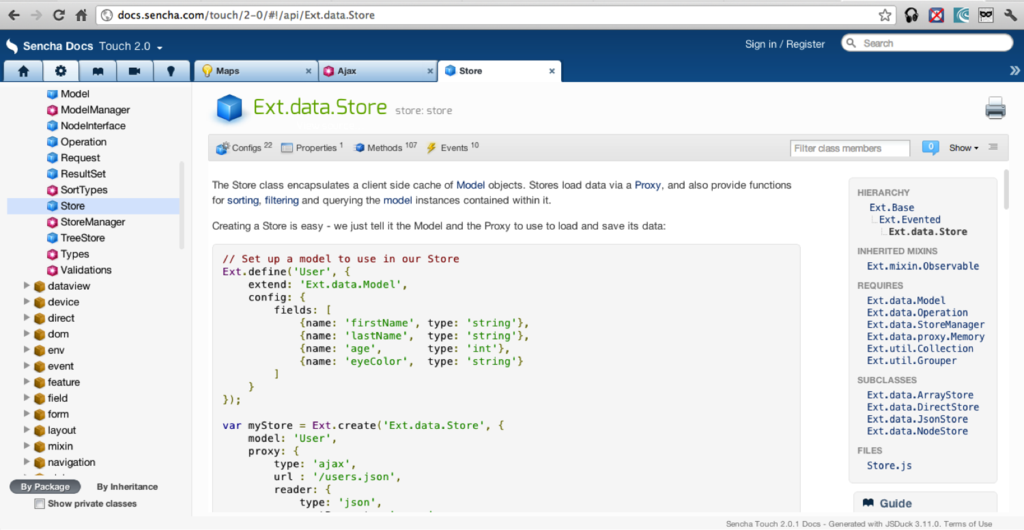
Example of How Routers & History Works
Step 1 - User is at Ext.data.Store page in Sencha Documentation
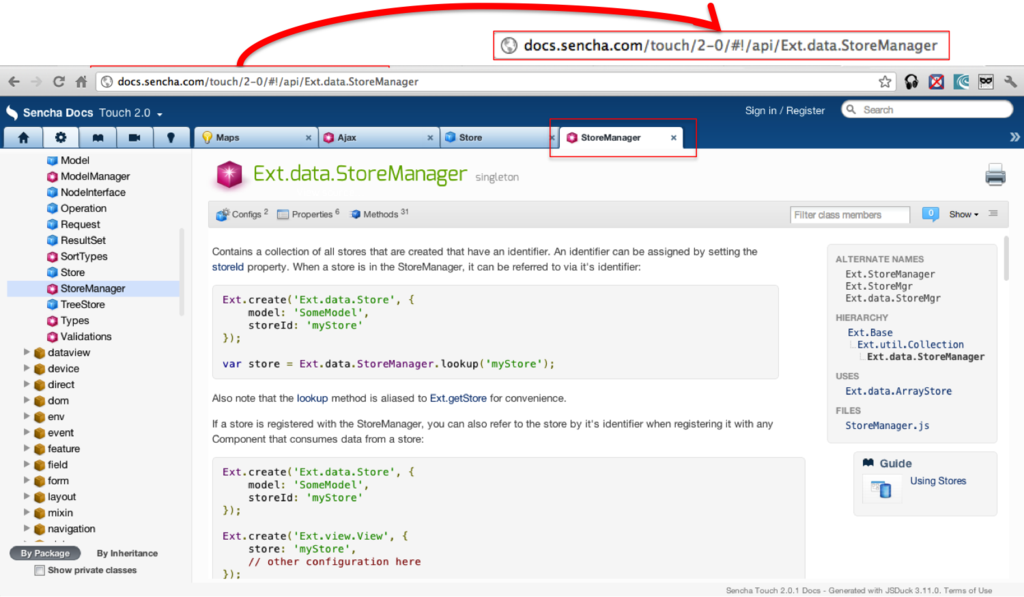
Step 2 - User clicks the StoreManager link
Step 3 - This changes the Browser address to http://docs.sencha.com/touch/2-0/#!/api/Ext.data.StoreManager
Step 4 - The Router framework is listening to any change in URL and triggers creation of an addition Tab to show Ext.data.StoreManager's apis
Examples of Pure Router Frameworks are
- Sammy JS
- Pager
- Dave JS
- Cross Roads
- Path JS
Other profound frameworks like Sencha, EXTJS & Backbone have their own Routers built in
DOM Manipulation
DOM Manipulation is all about manipulating HTML DOM at runtime.
- Most Popular Framework - jQuery
- Other Frameworks
- ZeptoUI
- XUI
Apparently jQuery also provides other api apart from DOM Manipulation like Ajax API etc
MicroTemplates
A good design pattern when building UI in javascript is to keep the markup code out side the JavaScript View logic.
The idea is to have a clear separation of Concern
JavaScript View
- Access Model
- Address UI Events
Markup Code aka Micro Template
- Map the Model attributes to the Markup
- Provide Markup with looping, conditional blocks capability
Example of Underscore Micro Template
<div id="placeholder"></div>
<script type="text/javascript">
// Compile the template using underscore
var tmplTxt = $("#search_template").html();
//_ stands for underscroe
var template = _.template(tmplTxt, {label:"Hello World"} );
$("placeholder").html( template );
</script>
//Template put in the script tag
<script id="search_template" type="text/template">
<label><%=label%></label>
<input type="text" id="search_input" />
<input type="button" id="search_button" value="Search" />
</script>
Once the MicroTemplate has run the div (placeholder) looks as follows
<div id="placeholder">
<label>Hello World</label>
<input id="search_input" type="text" />
<input id="search_button" type="button" value="Search" />
</div>
Following examples of standalone Micro Template libraries
- underscore
- handlerbar
- moustache
- etc
MV * Frameworks
By MV * frameworks we mean any frameworks which approximates to any of the following design patterns
- Model View Controller
- Model View View-Model
- Model View Presenter (rarely seen in JavaScript but main framework for GWT)
MVC Design Pattern
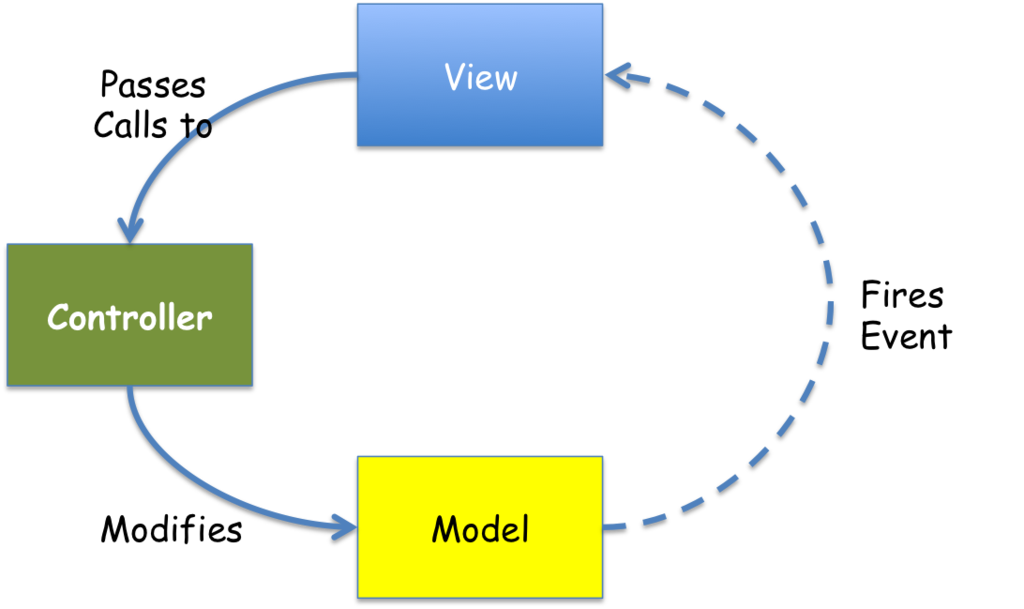
Backbone is one of the popular MVC Framework, also one of the most flexible frameworks which can work with other frameworks. Backbone is really a MV* framework and not really a pure MVC framework. In Backbone the View and Controller boundaries are blurred and the View represents both. Apart from this, Backbone has Model, Collection and Routers.
Backbone MVC Code Snippets
Model
Person = Backbone.Model.extend({
    initialize: function(){
        alert("Welcome to this world");
    }
});
var person = new Person({ name: "Thomas", age: 67});
View & Controller in View itself
SearchView = Backbone.View.extend({

    initialize: function(){
        this.render();
    },
    render:function(){
        this.$el.html("<button id="button">Click Me</button>");
    }
    events: {
        "click #button": "clickMe"
    },
    clickMe: function( event ){
         alert("You clicked me");
    }
});

// The initialize function is always called when instantiating a Backbone View.
// Consider it the constructor of the class.

var search_view = new SearchView($("#placeholder"));
In Backbone the View and Controller are combined into One. In the above code initialize() and render() method are View concept, and event object and clickMe() method are Controller concept.
Other Popular JavaScript MVC Frameworks are
- Angular Js
- ExtJS, Sencha Touch
- Ember JS
- Kendo UI
- etc
MV VM Design Pattern
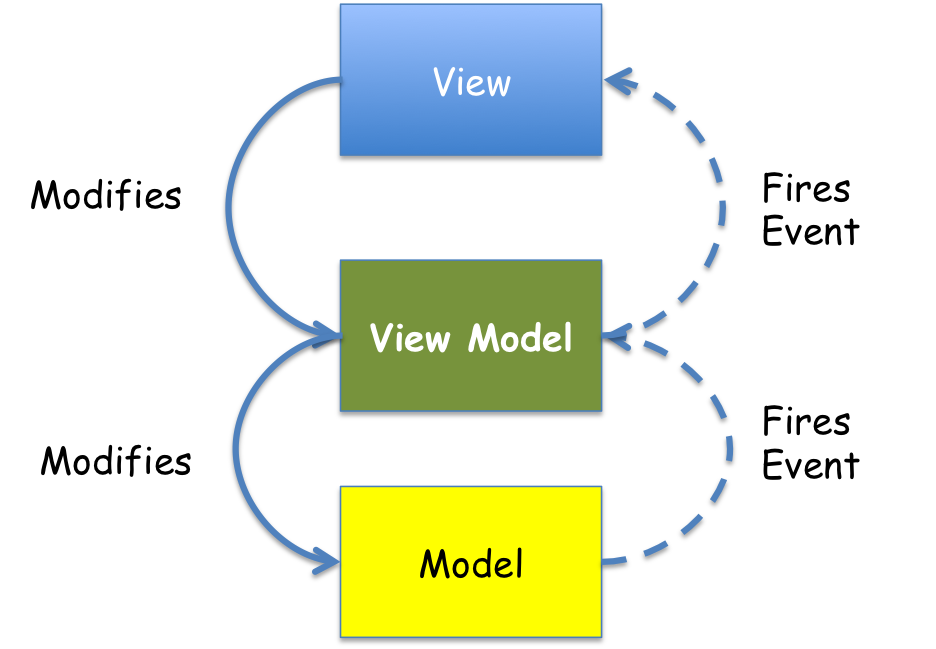
MV VM framework is about View and View Model living in pair and View Model adapting the Model (Domain Model) for the View
HTML Markup aka View
<p>First name: <strong >todo</strong data-bind="text:firstName" ></p>
<p>Last name: <strong>todo</strong data-bind="text:lastName" ></p>
JavaScript Code
function AppViewModel() {
    this.firstName = ko.observable("Rohit");
    this.lastName = ko.observable("Ghatol");
}

// Activates knockout.js
ko.applyBindings(new AppViewModel());
Output
HTML Markup
<p>First name: <strong >todo</strong data-bind="text:firstName" >Rohit</p>
<p>Last name: <strong>todo</strong data-bind="text:lastName" >Ghatol</p>
MVP Design Pattern
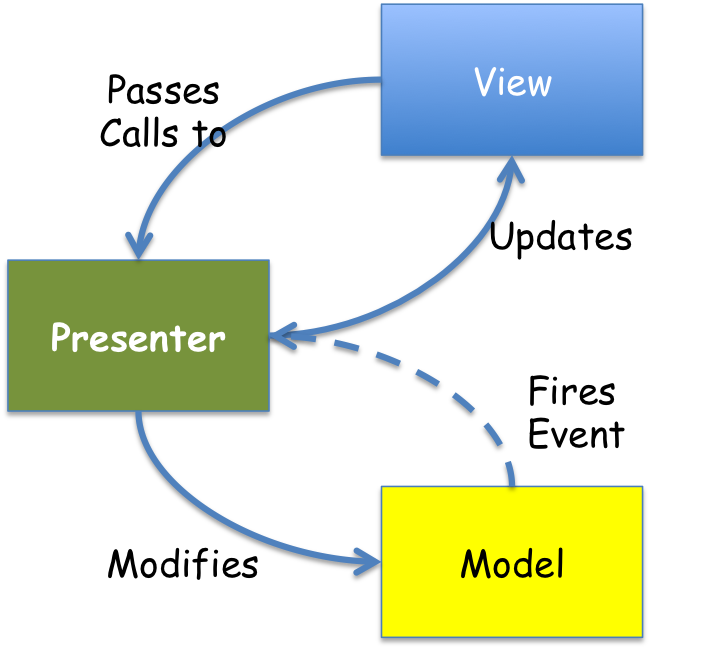
Like I mentioned before MVP is Design Pattern worth knowing, but it is not popular in JavaScript world. However it is the official Design pattern for GWT (Google Web Toolkit)
.
.
.
Data bound Views
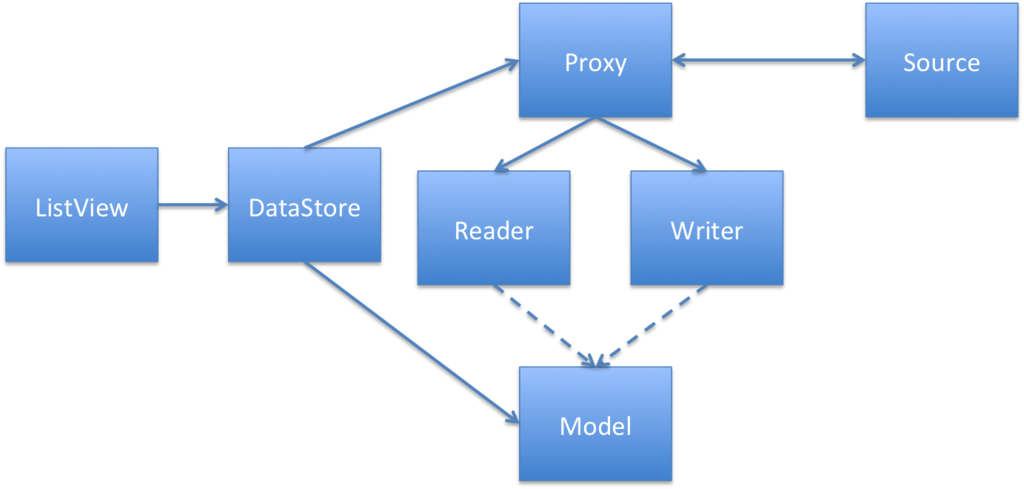
Data bound Views are views which take their data from a predefined data source. e.g GridView which talk to a Data Store which in turn reads out data from either a AJAX Source or Local Storage etc.
Following is how Sencha's Data Bound Views work
Following Libraries have Data Bound Views and Widgets (Views) in them
- ExtJs or Sencha Touch
- Backbone Js
Large Scale Application Frameworks
Design Patterns get us only so far when building Large Scale Applications. To really work on a Large Scale Application, we need an Architecture for it.
Aura Js is an upcoming popular Large Scale Application framework. It is based on the following design
[singlepic id=45 w=320 h=240 float=]
Aura Provides following
- A Framework to abstract out
- DOM Manipulation Frameworks
- MV* Frameworks
- Any framework your application depends on
- Aura Core is an extensible Core, User Extensions can be added to it to expand its capability
- Out of the box Aura Core comes with
- DOM Manipulation APIs under the hood calling jQuery. This can be switch to Zepto or any other
- MVC APIs which under the hood call BackBone
- Anything like a Logging or Authentication or Ajax APIs which the product needs should be added to Aura as Extensions
- Widgets are Views (out of box uses BackBone) which are running in Aura Sandbox
- Extensions can be used to provide Widgets additional APIs vai the Sandbox
- Widgets communicate to other Widgets only through the Sandbox
- Widgets do not access DOM, Ajax or anything directly but uses Sandbox for everything
Code Snippet
Aura BootStrap Code
require(['aura/aura'], function (Aura) {
    var app = new Aura();

    app.use('extensions/storage');
    app.start({ widgets: 'body' });
});
Extension
define(['underscore'], function (_) {
    var app;
    var todos = [];

    function createNewTask(data) {
        var task = _.extend(data, {id: _.uniqueId('task')});
        todos.push(task);

        app.sandbox.emit('storage/newTaskCreated', task);
    }

    function toggleTask(data) {
        var task = _.find(todos, function(task) {
            return task.id === data.id;
        })
        var completed = task.completed || false;
        task.completed = !completed;

        app.sandbox.emit('storage/taskToggled', task);
    }

    function deleteTask(data) {
        todos = _.reject(todos, function (task) {
            return task.id === data.id;
        });

        app.sandbox.emit('storage/taskDeleted');
    }

    function editTask(data) {
        var task = _.find(todos, function(task) {
            return task.id === data.id;
        })
        task.description = data.description;

        app.sandbox.emit('storage/taskEdited');
    }

    return {
        initialize: function (application) {
            app = application;
            app.sandbox.on('ui/createNewTask', createNewTask);
            app.sandbox.on('ui/toggleTask', toggleTask);
            app.sandbox.on('ui/deleteTask', deleteTask);
            app.sandbox.on('ui/editTask', editTask);
        }
    };

});
Widet Code
define(['underscore'], function (_) {

    return {
        template:
            '<header id="header">\
                <h1>todos</h1>\
                <input id="new-todo" placeholder="What needs to be done?" autofocus>\
            </header>',

        initialize: function () {
            _.bindAll(this);

            this.render();
            this.cacheElements();
            this.attachEvents();
        },

        render: function () {
            this.$el.html(this.template);
        },

        cacheElements: function () {
            this.$newTodo = this.$el.find('#new-todo');
        },

        attachEvents: function () {
            this.$el.find('#new-todo').on('keyup', this.createNewTask);
        },

        createNewTask: function(e) {
            if (e.which === 13) {
                var val = this.$newTodo.val();
                this.sandbox.emit('ui/createNewTask', {description: val});
                this.$newTodo.val('');
            }
        }
    };

});
Refer to Aura Todo MVC Example
Responsive UI
Response UI can mean number of things. However in the HTML5 world it means following
- SPA are responsive to any form factor and device
- Pages adapt to different Screen Sizes
This is best explained as an example
Look at the Screen shot below. This is how a responsive website looks on Desktop
[singlepic id=46 w=320 h=240 float=]
The same site adopts to the mobile browser as below. Notice the change in how menus are shown
[singlepic id=47 w=320 h=240 float=]
Further more see how Menus are loaded on mobile browser
[singlepic id=48 w=320 h=240 float=]
The two most popular Responsive UI framework out there are
- Twitter Bootstrap
- Zurb Foundation
Responsive UI frameworks are hard to define. They are really mix of
- Elaborate Grid System and CSS which make heavy use of Media Queries.
- Grid System is a way of saying that we will put the UI components across say 12 Columns in a Grid. Depending in the Screen size the Columns will stay intact or convert to Row as part of Responsive UI
- Media Queries are CSS snippets which apply themselves or remove themselves depending on Screen size. This how the above example worked.
- CSS Styling for Tabs, Buttons, Section, Bread Crumbs etc
- JavaScript APIs for Tabs, Buttons, Sections etc
- Ready to use Conversional Look and Feel, so you don't need a Designer to launch your work
The best part of Responsive UI is that they can be applied independently of MV* Framework. Also Responsive UI are tools for doing Quick Mockups.
Widget Set
Widget Sets are referred to as Framework which provide Richer Widgets. There are pure widget set frameworks and other more profound javascript framework where widget set is one of the many part
One of the popular Pure Widget Set framework is jQuery UI.
[singlepic id=49 w=320 h=240 float=]
Other more popular and profound Frameworks with Richer Widget Sets are
- Sencha Touch/ExtJs
- Kendo UI
- etc
[singlepic id=51 w=320 h=240 float=]
[singlepic id=50 w=320 h=240 float=]
HTML5 Features
HTML5 Features are provided by the browser. However there are issues with cross browser compatibility. Some browsers are better than others in supporting HTML5 Features.
A SPA Product needs to work on all sorts of Browsers. It needs to leverage features where they are available out of the box, and it needs to either simulate features or do a graceful fallback when the features are not available out of the box.
HTML5 SPA Product development needs two things
- Design Time Information to make critical decisions. What features to incorporate and what to let go.
- Runtime Libraries to detect HTML 5 Features, Simulate or do graceful fallback
Design Time Tools
Design time tools are for making decisions on which HTML 5 Feature to go with depending on the browser support available.
One of my favorite tool for this is http://html5please.com. Only only does it tell whether a feature is safe to use on all modern available browser, but it also recommends polyfills if required. It also cautions about a feature if polyfills are missing or major browser (e.g IE 10) is not supporting the feature
[singlepic id=52 w=500 h=350 float=]
Apart from this one there are the following
- http://caniuse.com
- http://html5test.com
Run Time Tools
Runtime tools in HTML5 are of 2 types
- Feature Detection and Fallback Mechanims
- Polyfills
Feature Detection and Fallback Mechanism
Modernizr is a popular JavaScript library which can provide details like which HTML5 Features are supported by the browser running it.
Modernizr.load({
  test: Modernizr.geolocation,
  yep : 'geo.js',
  nope: 'geo-polyfill.js'
});
In the above code we are testing if geolocation feature is available on the browser, if so use the geo.js javascript file, and if not then fallback using geo-polyfill.js.
PolyFills
Polyfills are mechanisms to provide to a missing HTML5 Feature. e.g In IE6, there is no support for Canvas, we can add this support by using the ExCanvas Polyfill, which uses flash internally to do rendering, but adheres to the same canvas apis.
There are many polyfills out there. However using Polyfills can degrade performance (as these are not provided by browsers, but are software simulated). Here are few examples
- SVG Web - http://code.google.com/p/svgweb/
- ExCanvas - http://code.google.com/p/explorercanvas/
- Storage Polyfill - http://www.calormen.com/polyfill/#storage
- HTML5 Shiv - http://github.com/afarkas/html5shiv
- HTML5 Media - http://github.com/etianen/html5media
- Event Source - https://github.com/remy/polyfills/blob/master/EventSource.js
Visit this github repository to find all popular polyfills.
3D/2D Graphics/Visualization
3D and 2D Visualization even though part of HTML5 feature set , require special attention.
WebGL forms the basis for 3D Visualization and Canvas/SVG form the basic for 2D Visualization/Charts and Graphs
WebGL
Programming in WebGL is tough and unproductive. Abstraction level frameworks are required to ease programming effort when working with WebGL.
Popular 3D Libraries are
- Three.js
- X3DOM
- Scene.js
- etc
Three.js Demo
 X3DOM Demo

Charts/Graphs
Charts and Graphs can be created in HTML5 using any of the following technologies
- Canvas
- SVG
- VML
- Divs
Charts and Visualizations libraries can be categorized roughly into two
- Actual Charts/Graphs Libraries
- High Charts
- JS Charts
- Plot Kits
- Google Visualizations
- Advanced more Generic Visualization Libraries
- D3JS
The key difference is D3JS is more generic and more power visualization framework. It should be used when more complex visualizations are required which are not available out of the box.
Like the following Back to Back Bar Chart.
[iajsfiddle fiddle="DWJ35" height="500px" width="100%" show="result,js" skin="default"]
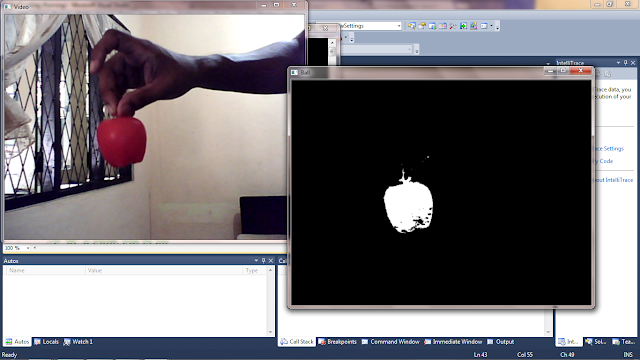


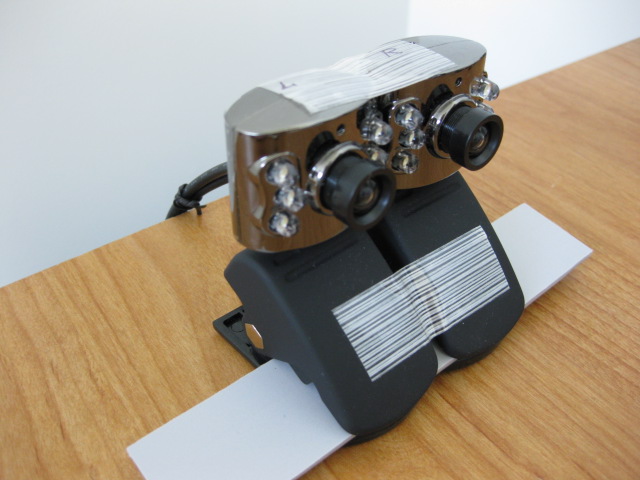 and this setup works well, but for Computer Vision if you are experimenting in a Lab