Advanced Programming - Three.js (WebGL)


Advanced Programming - Three.js (WebGL)

Chapter 1 - Terrain Generator

[iajsfiddle fiddle="7Mkhp" height="500px" width="100%" show="result,js,html" skin="default"]

Chapter 2 - Advanced Geometry

Shows how to use Tube Geometry based on the Path

Instructions

  1. Rotate - Left Mouse Click and Drag
  2. Pan - Middle Mouse/Scroll Wheel Click and Drag (OSX - 2 finger click and drag)
  3. Zoom - Scroll Wheel (OSX - 2 finger drag)

[iajsfiddle fiddle="HeTaX" height="500px" width="100%" show="result,js,html" skin="default"]

Chapter 4 - Math based Geometry

Instructions

  1. Rotate and Pan- Mouse Move

[iajsfiddle fiddle="btKBw" height="500px" width="100%" show="result,js,html" skin="default"]


Chapter 5 - Selecting Objects in 3D and Smooth Animation

Shows how to select Objects in 3D Space.

Instructions

  1. Rotate - Left Mouse Click and Drag
  2. Pan - Middle Mouse/Scroll Wheel Click and Drag (OSX - 2 finger click and drag)
  3. Zoom - Scroll Wheel (OSX - 2 finger drag)
  4. Push Colored Cube Behind - Left Mouse Click
  5. Pull Colored Cube Ahead - Ctrl + Left Mouse Click

[iajsfiddle fiddle="9gdRR" height="500px" width="100%" show="result,js,html" skin="default"]


Chapter 6 - 3D Object Manipulation

Example of showing a cross section of a 3D Cylinder by cutting out a Cube from it at a 45 degree angle.


[iajsfiddle fiddle="eJ5Nh" height="500px" width="100%" show="result,js,html" skin="default"]

Programming Three.js (WebGL)


Basic Programming - Three.js (WebGL)

Chapter 1 - Getting Started with Three.js

[iajsfiddle fiddle="ENUFy" height="500px" width="100%" show="result,js,html" skin="default"]

Step by Step Instructions

Configure JsFiddle as follows

  1. Framework & Extensions shows following Settings
    1. jQuery 1.9.1
    2. onLoad
  2. External Resource
    1. Add the url "http://threejs.org/build/three.min.js"
    2. Add the url "http://threejs.org/examples/js/controls/TrackballControls.js"

Create Skeleton Code

var renderer = createRenderer();
var scene = createScene();
var camera = createCamera();
var light = createLight();
var object3D = create3DObject();

scene.add(light);
scene.add(object3D);

renderer.render(scene,camera);

$("#container").append(renderer.domElement);

Create Renderer

var WIDTH=400;
var HEIGHT=400;

var createRenderer = function(){

var renderer = new THREE.WebGLRenderer();
    renderer.setSize(WIDTH,HEIGHT);
    return renderer;
}

Create Scene

var createScene = function(){
    var scene = new THREE.Scene();
    return scene;
}

Create Camera

var ASPECT = WIDTH/HEIGHT;
var ANGLE = 45;
var NEAR = 1;
var FAR = 1000;

var createCamera = function(){
var camera = new THREE.PerspectiveCamera(
ANGLE,ASPECT,NEAR,FAR);

//Pulling Camera back by 300 towards us
camera.position.z=300;

return camera;
}

Create Light

var createLight = function(){
    var light = new THREE.PointLight(0xFFFFFF);
    //Pulling light 100 points towards us
    light.position.z=100;
    return light;
}

Create Object3D - Skeleton

var create3DObject = function(){
    var geometry = ..;
    var material = ..;

    var cubeMesh =
        new THREE.Mesh(geometry,material);

    return cubeMesh;
}

Create Object3D - Geometry & Material

var create3DObject = function(){
    var geometry =
        new THREE.CubeGeometry(30,30,30);

    var material =
        new THREE.MeshLambertMaterial(
            {color:0xFF0000});

    var cubeMesh =
        new THREE.Mesh(geometry,material);
    cubeMesh.position.x=0;
    cubeMesh.position.y=0;
    cubeMesh.position.z=0;
    cubeMesh.rotation.x=45;
    cubeMesh.rotation.y=45;
    cubeMesh.rotation.z=45;
    return cubeMesh;
}

Chapter 2 - Understanding WebGL Axis System

WebGL Axis System
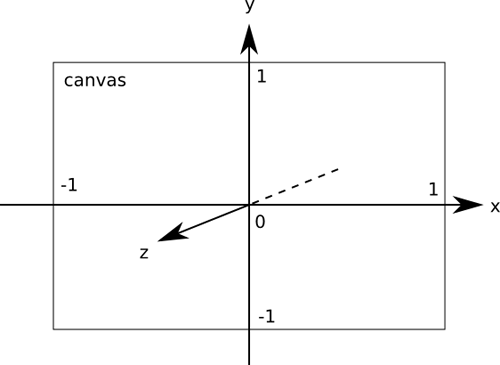
Three.js Program depicted Axis System [iajsfiddle fiddle="YmJZM" height="500px" width="100%" show="result,js,html" skin="default"]

 Create Custom Built 3D Axis

var createAxis=function(src,dst,colorHex,dashed){
    var geom = new THREE.Geometry(),
        mat; 

    if(dashed) {
        mat = new THREE.LineDashedMaterial(
            { 
                linewidth: 3, 
                color: colorHex, 
                dashSize: 3, 
                gapSize: 3 
             });
    } 
    else {
        mat = new THREE.LineBasicMaterial(
            { 
                linewidth: 3, 
                color: colorHex 
            });
    }

    geom.vertices.push( src.clone() );
    geom.vertices.push( dst.clone() );
    // This one is SUPER important, otherwise 
    // dashed lines will appear as simple plain 
    // lines
    geom.computeLineDistances(); 

    var axis = new THREE.Line( 
        geom, mat, THREE.LinePieces );

    return axis;
}
var createAxes = function(length) {
    var axes = new THREE.Object3D();

    axes.add( createAxis( 
        new THREE.Vector3( 0, 0, 0 ), 
        new THREE.Vector3( length, 0, 0 ), 
        'red', false ) ); // +X

    axes.add( createAxis( 
        new THREE.Vector3( 0, 0, 0 ), 
        new THREE.Vector3( -length, 0, 0 ), 
        'red', true) ); // -X

    axes.add( createAxis( 
        new THREE.Vector3( 0, 0, 0 ), 
        new THREE.Vector3( 0, length, 0 ), 
        'blue', false ) ); // +Y

    axes.add( createAxis( 
        new THREE.Vector3( 0, 0, 0 ), 
        new THREE.Vector3( 0, -length, 0 ),
        'blue', true ) ); // -Y

    axes.add( createAxis( 
        new THREE.Vector3( 0, 0, 0 ), 
        new THREE.Vector3( 0, 0, length ), 
        'green', false ) ); // +Z

    axes.add( createAxis( 
        new THREE.Vector3( 0, 0, 0 ), 
        new THREE.Vector3( 0, 0, -length ), 
        'green', true ) ); // -Z

     return axes;
}

Add Axis to Scene

scene.add(createAxes(100));

Chapter 3 - Playing with Animation

[iajsfiddle fiddle="qhbq9" height="500px" width="100%" show="result,js,html" skin="default"]

Instead of Rendering Directly use requestAnimationFrame Replace following code snippet with

renderer.render(scene,camera);

this one

var render = function(){
    renderer.render(scene,camera);
}
var animate = function(){
    requestAnimationFrame(animate);
    render();
}

animate();

Chapter 4 - Playing with Groups in Three.js

[iajsfiddle fiddle="WPgrF" height="500px" width="100%" show="result,js,html" skin="default"]

[iajsfiddle fiddle="pNrT7" height="500px" width="100%" show="result,js,html" skin="default"]

First Add the following Function to your Code

var createCube = function(
    width,height,depth,color){
    var cubeGeometry = new THREE.CubeGeometry(
        width,height,depth);

    var material = 
        new THREE.MeshLambertMaterial(
            {
                color:color
            });

    var cubeMesh = new THREE.Mesh(
        cubeGeometry,material);

    return cubeMesh;

};

Then create various Cube Objects

var cube1 = createCube(30,30,30,'red');
var cube2 = createCube(10,10,10,'yellow');
var cube3 = createCube(5,5,5,'green');

Then Organize the Cube Objects in Groups

var subGroup = new THREE.Object3D();
subGroup.add(cube2);
cube3.position.y=-40;
subGroup.add(cube3);

cube1.position.x=-40;
subGroup.position.x=30;
var group = new THREE.Object3D();
group.add(cube1);
group.add(subGroup);

Add the Group to the Scene

scene.add(group);

Finally modify the animate function to rotate cube, groups individually around different axis

var animate = function(){
    requestAnimationFrame(animate);
    cube1.rotation.x+= 0.05;
    subGroup.rotation.z+= 0.05;
    group.rotation.y+= 0.01;
    render();
}


Chapter 5 - Playing with User Controls

Instructions

  1. Rotate - Left Mouse Click and Drag
  2. Pan - Middle Mouse/Scroll Wheel Click and Drag (OSX - 2 finger click and drag)
  3. Zoom - Scroll Wheel (OSX - 2 finger drag)

[iajsfiddle fiddle="jeq3W" height="500px" width="100%" show="result,js,html" skin="default"]

Add a TrackBall Control

var createControls = function(camera){

    var controls = new 
        THREE.TrackballControls(camera);

    controls.rotateSpeed = 1.0;
    controls.zoomSpeed = 1.2;
    controls.panSpeed = 0.8;

    controls.noZoom = false;
    controls.noPan = false;

    controls.staticMoving = true;
    controls.dynamicDampingFactor = 0.3;

    controls.keys = [ 65, 83, 68 ];

    return controls;
}

Render things when user changes the Camera using TrackBall Control

controls.addEventListener('change',render);

Also update the controls on each animationFrame

var animate = function(){
    requestAnimationFrame(animate);
    object3D.rotation.y+= 0.01
    object3D.rotation.z+= 0.01
    render();
    controls.update();
}


Chapter 6 - Three.js Built in Helpers

Shows how to use inbuilt Grid Helper and Axis Helper

[iajsfiddle fiddle="tn9sm" height="500px" width="100%" show="result,js,html" skin="default"]


Use Ready made Axis code Provided by THREE.js

scene.add(new THREE.AxisHelper(100));
scene.add(new THREE.GridHelper(100,10));


New Age Prototyping/Mockups in HTML5

New Age Prototyping in HTML5 In the new age, Prototype are not wireframes any more, but live interactions. More important these prototypes need to provide the following on Day One

  1. Cool and Conventional Standard UI used by sites like Twitter, Facebook etc. The stake holders looking at the prototypes/mockups should be able to relate to a finished product from Day One
  2. Responsive UI or Mobile First Experience is the key to selling. While your Mobile Apps are being built, there needs to be a fallback to Mobile First Web Sites.
  3. Interactions - Where this is hard coded or behind the scene you have a BAAS. Providing some degree of Interactions wins yours Stake Holders.

At the end Seeing is Believing. The Auto Industry has been doing this for ages with their Clay models. For our Industry following are our Clay Model Tools

  1. Foundation - http://foundation.zurb.com/
  2. Twitter BootStrap - http://twitter.github.io/bootstrap/

Best part of the both the above framework is with minimalistic knowledge of HTML and CSS you can pull up great prototypes and mockups with live interaction in no time. And convince the stake holders of Mobile First Experience of Conventional New Age Sites like Twitter, Facebook, Linked in etc.

Whether you are a Developer or QA or Product Owner, the suggestion is not to wait but to try out the new Age Prototyping/Mockups in HTML5 using Foundation or Twitter BootStrap.


D3JS - The jQuery of HTML5 Visualization world

D3JS - jQuery of Visualization world In today's world with growing HTML5 UI in almost every product we are starting, Visualization becomes a core part of the Product.

While there are many charting and visualization solutions out there, the choice for us an Engineering Partners is to choose one solution which has all the necessary building blocks to accomplish anything.

For Synerzip I recommend D3JS as the data visualization Framework


  1. D3JS stands for Data Driven Document and not a charting solution
  2. If any charts are not supported by D3JS or its eco system, building one is a breeze
  3. D3JS can create charts using regular DOM elements or SVG etc

As a HTML5 Practice is becoming more and more important in Synerzip, I recommend everyone to pickup D3JS

Training Material

  1. Introduction to D3JS Video - http://vimeo.com/35005701#
  2. Youtube Playlist for Learning D3JS - http://www.youtube.com/playlist?list=PL6il2r9i3BqH9PmbOf5wA5E1wOG3FT22p
  3. Tutorial Site for D3 JS - http://www.dashingd3js.com/table-of-contents

Here is an example of a Back to Back Bar Chart I created using D3 Charts

[singlepic id=42 w=320 h=240 float=]

Here is the code for the same

var dataset = [ { "name":"Ford-150", "acceleration":50, "economy":17 }, { "name":"Chevy-Avalanche", "acceleration":70, "economy":15 }, { "name":"Toyota-Tundra", "acceleration":60, "economy":22 }, { "name":"Honda Pilot", "acceleration":79, "economy":2 }, { "name":"Ford-250", "acceleration":40, "economy":15 }] var bodySelection = d3.select("body");

var w = 500; var h = 100;

var svg = bodySelection.append("svg") .attr("width",200) .attr("height", 120);

svg.selectAll("rect.acceleration") .data(dataset) .enter() .append("rect") .attr("x", 100) .attr("y", function(d, i) { return i * 21; }) .attr("width", function(d) { return d.acceleration; }) .attr("height", 20) .attr("fill", "red");

svg.selectAll("rect.economy") .data(dataset) .enter() .append("rect") .attr("x", 0) .attr("y", function(d, i) { return i * 21; }) .attr("width", function(d) { return d.economy; }) .attr("height", 20) .attr("transform", "translate(95,0),scale(-1,1)") .attr("fill", "teal")

svg.selectAll("text.car") .data(dataset) .enter() .append("text") .attr("x", 0) .attr("y", function(d, i) { return 10+i * 21; }) .attr("height", 20) .text(function(d,i){ return d.name }) .attr("font-family", "sans-serif") .attr("font-size", "8px")


KinoCards - QR Code Business Card Creator for Synerzip

KinoCards is a QR Code Business Card Creator. As an Minimal Viable Product, it only supports Synerzip Business Card. Also it does not supports any storage or login functionality in its version 1.

Front Side of Business Card
Inline image 3
QR Codes on Business Card are really helpful. If you ever get a Business Card with a QR Code, take your Smart Phone, start any popular QRCode Scanner App (e.g QR Droid for Android, QR Reader for iPhone, QR Code Reader for Windows Phone). Scan the Business Card (as shown below) and it will import the contact details as a VCard.
Back Side of Business Card
Inline image 4
On the back side of the Business Card is another QR Code, which takes you to a page with entire Social Profile.
How to use from Android Phone (and similarly any other Smart Phone)
 
Step 1
 
Install QR Droid on Android
Step 2
 
Inline image 2
Step 3 
Fill in your details and see the Business cards being created. Download the images for printing.
Step 4
User QR Droid on Android to point to the front of Business Card and see it will prompt you to add the contact in your Address Book
Inline image 9
Inline image 5
Step 5
User QR Droid on Android to point to the back of Business Card and see it will prompt you and open a web page with details about your twitter,linkedin, github pages
 Inline image 10
Inline image 6
Inline image 7
Features in Future
The UI is not yet polished, it will be made polished in next couple of days using Twitter BootStrap. Also we will add the functionality to Login with Synerzip Google Apps, where you can store your profile and browse other people's profile (and scan their business card to import contact directly to your address book).
This MVP (Minimal Viable Product) was done in 6 hours using NodeJs and KnockoutJS and QR Code and HTML5 Canvas APIs.